Making a beautiful charcuterie board is much easier than it looks! With a mix of cheeses, meats, crackers, fruit, dips, vegetables, olives, pickles, and a few fun sweets, you can create an impressive appetizer that’s perfect for parties, holidays, game days, or entertaining at home.
This version is styled as a fall and Halloween charcuterie board, but the same basic method works for just about any theme. Once you know how to build the board, you can simply change the cookie cutter you use for the brie, swap out the sweets, and adjust the colors to fit Christmas, Easter, summer, birthdays, or any other occasion.
Why You’ll Love This Charcuterie Board
Charcuterie boards are one of my favorite appetizers for entertaining because they look impressive without requiring much actual cooking.
They’re also completely customizable. You can change the meats, cheeses, crackers, fruit, vegetables, dips, and sweets based on the season or what you already have on hand.
For fall and Halloween, I love using orange, red, black, white, and yellow ingredients to give the board a festive seasonal look without making it feel overdone.
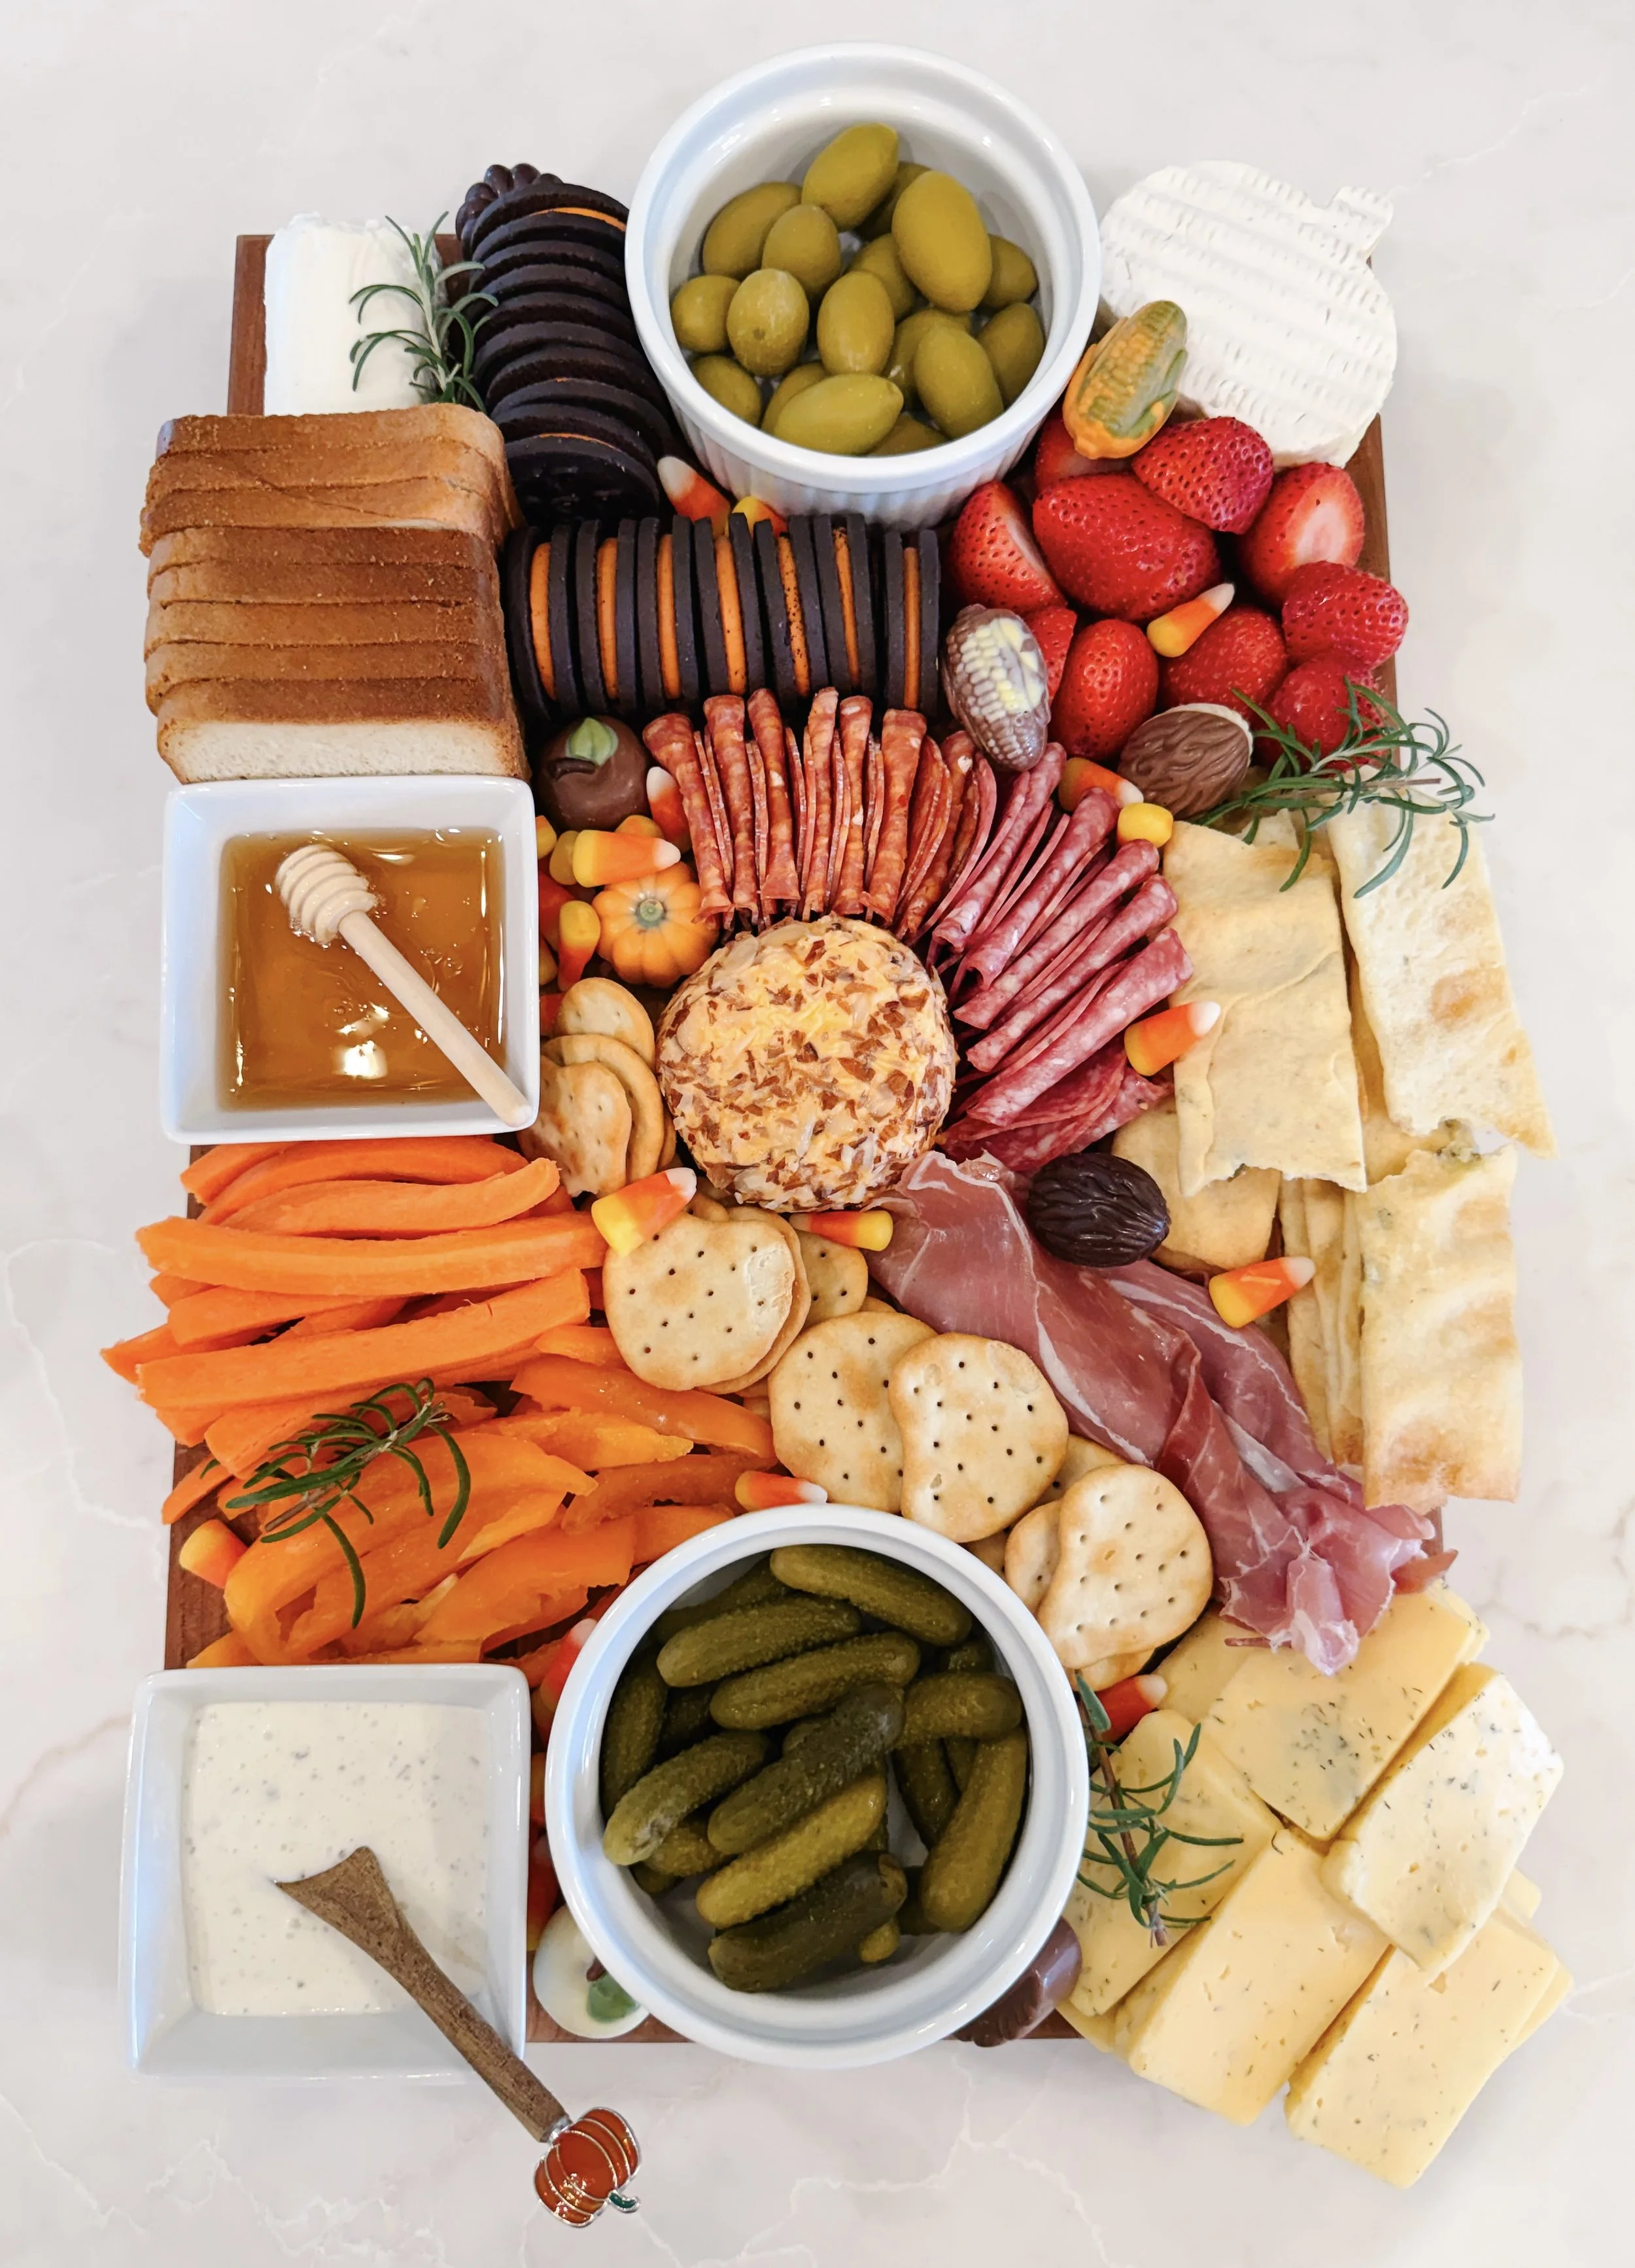
Easy Fall & Halloween Charcuterie Board
This easy fall charcuterie board combines cheeses, cured meats, crackers, fruit, olives, pickles, dips, vegetables, and Halloween treats for a fun appetizer that’s perfect for fall gatherings and Halloween parties.
Charcuterie Board Details
Category: Appetizer
Prep Time: About 20–30 minutes
Total Time: About 30 minutes
Servings: About 8–12, depending on the size of your board
Note: Charcuterie boards are very flexible. The exact amounts you need will depend on the size of your board and how many people you are serving.
What to Put on a Charcuterie Board
You don’t need every ingredient listed here. I like to choose a few items from each section and adjust them depending on the size and theme of my board.
Cheese
I usually start with about 3–5 different cheeses so there’s a good variety of flavors and textures.
Some of my favorites are:
Brie
Goat Cheese
Sharp cheddar
Gouda
Havarti
Dill Havarti
White cheddar
Pepper jack
A cheese ball
One of my favorite ways to make the board fit the season is to use a cookie cutter on the brie.
For a Halloween or fall charcuterie board, I like to use a pumpkin-shaped cookie cutter to cut a pumpkin shape into the top of the brie.
You can use this same idea all year long. Just switch the cookie cutter to match whatever theme you’re going for.
Meats
I usually choose 2–3 cured meats.
Good options include:
Salami
Prosciutto
Soppressata
Pepperoni
Summer sausage
The biggest trick with the meat is to fold it instead of laying it flat.
You can fold salami in halves or quarters, make ribbons with prosciutto, or create small piles of meat throughout the board.
This adds height and makes the board look much fuller.
Crackers & Bread
I like having a couple of different cracker shapes and textures.
Some good options are:
Butter crackers
Multigrain crackers
Artisan crackers
Naan crackers
Crostini
Sliced baguette
Spread the crackers around the board instead of putting all of them in one area. It makes the board easier to serve and gives it a more balanced look.
Fresh Fruit
Fresh fruit adds color, sweetness, and freshness to the board.
Some of my favorites are:
Red grapes
Green grapes
Apples
Blackberries
Blueberries
Strawberries
Raspberries
Fresh figs
Clusters of grapes and berries are especially helpful for filling larger spaces.
If you’re using apples, you can lightly toss them with lemon juice to help slow down browning.
Olives & Pickles
After the fruit, I like to add something salty and tangy.
Some easy options are:
Green olives
Kalamata olives
Mixed olives
Dill pickles
Cornichons
You can place the olives and pickles directly on the board, but I usually prefer putting them in small bowls.
The bowls help keep any liquid from getting onto the cheese, crackers, or other ingredients.
Dips & Spreads
Once the main ingredients are in place, I add my dips and spreads.
My favorites are:
Honey
Red pepper jelly
Olive tapenade
Honey and red pepper jelly are especially good because they pair well with both the meats and cheeses.
You can put these in small bowls around the board or drizzle a little honey directly over a soft cheese like brie.
Vegetables
Vegetables are optional, but I like adding them sometimes because they give the board another texture and help balance out all the richer ingredients.
For a fall board, I especially like:
Carrots
Orange bell pepper
The orange colors work perfectly with a Halloween or fall theme.
If I add vegetables, I’ll usually add a small bowl of ranch dressing nearby for dipping.
Nuts & Crunchy Extras
I don’t usually use a large amount of traditional nuts, but I do like adding a few crunchy extras.
Some of my favorites are:
Chocolate-covered almonds
Pistachios
Chocolate-covered almonds are especially nice because they work as both a sweet treat and a crunchy filler.
Halloween Sweets
The last step is one of my favorites: filling in the remaining spaces with themed sweets.
For a Halloween charcuterie board, try:
Halloween Oreos
Candy corn
Fall-shaped chocolates
Halloween gummies
Mini chocolate candies
Candy pumpkins
These little extras are what really make the board feel festive.
You don’t need a huge amount. Just use them to fill small spaces and add pops of color throughout the board.
How to Build a Charcuterie Board
1. Start With the Cheese
I always start my charcuterie board with the cheese.
Place your larger cheeses first, since they take up the most space and help establish the layout of the board.
For this Halloween board, this is also when I use a pumpkin-shaped cookie cutter on the brie.
Add your cheese ball and any other cheeses you’re using around the board, leaving space between them for the other ingredients.
2. Add the Meat
Next, add the cured meats.
Fold the meat instead of laying it flat. This gives the board more dimension and makes everything look fuller.
Spread your meats around the cheeses instead of keeping them all together.
3. Add the Crackers
Next, add your crackers.
Fan them out, stack them slightly, or tuck them around the cheeses and meats.
Using more than one type of cracker gives the board extra texture and makes it look more interesting.
4. Add the Fruit
Now add your fresh fruit.
Use grapes, strawberries, blueberries, blackberries, apples, pears, or whatever fruit fits your theme.
Fruit is great for filling some of the larger open areas while adding fresh color to the board.
5. Add Olives & Pickles
Next, add olives and pickles.
I like putting these in small bowls so the brine doesn’t spread onto the rest of the board.
Tuck the bowls into open areas between the meats, cheeses, and crackers.
6. Add Dips & Spreads
Add your small bowls of honey, red pepper jelly, olive tapenade, or any other dips you’re using.
These are great for pairing with the cheese, crackers, and meats.
7. Add Vegetables
If you’re using vegetables, add them next.
For a fall or Halloween board, carrots and orange bell peppers are perfect.
Add a small bowl of ranch if you want an easy dipping option.
8. Add Nuts & Crunchy Extras
Fill in a few spaces with chocolate-covered almonds or pistachios.
They’re especially useful for filling narrow gaps where larger ingredients won’t fit.
9. Fill the Remaining Spaces With Sweets
Finish the board with Halloween-themed sweets.
Add Halloween Oreos, candy corn, fall-shaped chocolates, gummies, or other candies throughout the board.
At this point, you really just want to fill in any noticeable empty spaces.
10. Garnish the Board
For one final touch, you can tuck a few small sprigs of fresh rosemary around the board.
The deep green color looks especially pretty against the orange, red, and cream colors of a fall charcuterie board.
My Easy Charcuterie Board Formula
If you’re not sure where to start, this is a good basic formula:
3–5 cheeses
2–3 meats
2–3 types of crackers
1-2 fresh fruits
Olives and/or pickles
2–3 dips or spreads
Optional vegetables
1–2 crunchy extras
Themed sweets
Optional fresh rosemary for garnish
You can scale everything up or down depending on how many people you’re serving.
Tips for Making a Beautiful Charcuterie Board
Start with the largest items. Cheese, cheese balls, and bowls should go down first because they take up the most room.
Fold your meat. Folded meats add height and make the board look much more abundant.
Use different shapes. Cubed cheese, wedges, round bowls, folded meats, crackers, berries, and candies all help make the board visually interesting.
Spread colors around. Try not to put all of your orange ingredients or all of your dark ingredients in one place.
Fill the gaps. Once the main board is finished, use berries, pistachios, chocolate-covered almonds, and sweets to fill in small spaces.
Don’t worry about making it perfect. Charcuterie boards look best when they feel full, relaxed, and abundant.
How to Change the Theme of Your Charcuterie Board
The best part about this method is that you can use it for almost any holiday or event.
Keep your cheeses, meats, crackers, fruit, olives, and dips mostly the same, then change the decorative pieces and sweets.
You can also use a different cookie cutter on your brie to match the theme.
Christmas Charcuterie Board
Use a Christmas tree, star, or snowflake cookie cutter on the brie.
Add festive sweets such as:
Little Debbie Christmas Tree Cakes
Christmas chocolates
Peppermint candies
Red and green candies
Fresh rosemary also works especially well for a Christmas board because it resembles little evergreen branches.
Easter Charcuterie Board
Use a bunny, egg, or flower cookie cutter for the brie.
Fill the board with:
Easter candy
Mini chocolate eggs
Pastel chocolates
Easter cookies
Summer Charcuterie Board
For summer, use brighter fresh fruit and lighter flavors.
Try:
Strawberries
Blueberries
Grapes
Peaches
Fresh vegetables
Lighter cheeses
Honey
Colorful summer sweets
Once you know the basic layout, changing the theme is really just about changing the colors, sweets, and a few decorative touches.
Can I Make a Charcuterie Board Ahead of Time?
Yes. You can prepare a large portion of the board ahead of time.
Arrange the cheeses, meats, olives, pickles, and other refrigerated ingredients, then cover the board and refrigerate it until closer to serving.
Wait until shortly before serving to add crackers so they stay crisp.
I also prefer adding fresh-cut apples and pears closer to serving so they look their best.
The candy and other sweets can be added at the end.
How Much Charcuterie Do I Need Per Person?
If the charcuterie board is being served as an appetizer, a good starting point is around 2–3 ounces of meat and cheese per person combined, plus crackers, fruit, vegetables, and other extras.
If the board will be the main food for the gathering, simply increase the amount of meat, cheese, crackers, and other filling ingredients.
Final Thoughts
Making a beautiful fall or Halloween charcuterie board doesn’t have to be complicated.
I like to start with the cheese, add folded meats and crackers, then layer in fresh fruit, olives, pickles, dips, vegetables, and crunchy extras. Finally, I fill in the remaining spaces with seasonal sweets and a little rosemary for garnish.
Once you learn this basic method, you can use it for almost any occasion. Change the shape you cut into the brie, switch the sweets to match the holiday, and you have an easy charcuterie board you can make all year long.

My Easy Charcuterie Board Formula
This easy fall charcuterie board combines cheeses, cured meats, crackers, fruit, olives, pickles, dips, vegetables, and Halloween treats for a fun appetizer that’s perfect for fall gatherings and Halloween parties.
Ingredients
- 3–5 cheeses
- 2–3 meats
- 2–3 types of crackers
- 1-2 fresh fruits
- Olives and/or pickles
- 2–3 dips or spreads
- Optional vegetables
- 1–2 crunchy extras
- Themed sweets
- Optional fresh rosemary for garnish
Instructions
- I always start my charcuterie board with the cheese.
- Place your larger cheeses first, since they take up the most space and help establish the layout of the board.
- For this Halloween board, this is also when I use a pumpkin-shaped cookie cutter on the brie.
- Add your cheese ball and any other cheeses you’re using around the board, leaving space between them for the other ingredients.
- Next, add the cured meats.
- Fold the meat instead of laying it flat. This gives the board more dimension and makes everything look fuller.
- Spread your meats around the cheeses instead of keeping them all together.
- Next, add your crackers.
- Fan them out, stack them slightly, or tuck them around the cheeses and meats.
- Using more than one type of cracker gives the board extra texture and makes it look more interesting.
- Now add your fresh fruit.
- Use grapes, strawberries, blueberries, blackberries, apples, pears, or whatever fruit fits your theme.
- Fruit is great for filling some of the larger open areas while adding fresh color to the board.
- Next, add olives and pickles.
- I like putting these in small bowls so the brine doesn’t spread onto the rest of the board.
- Tuck the bowls into open areas between the meats, cheeses, and crackers.
- Add your small bowls of honey, red pepper jelly, olive tapenade, or any other dips you’re using.
- These are great for pairing with the cheese, crackers, and meats.
- If you’re using vegetables, add them next.
- For a fall or Halloween board, carrots and orange bell peppers are perfect.
- Add a small bowl of ranch if you want an easy dipping option.
- Fill in a few spaces with chocolate-covered almonds or pistachios.
- They’re especially useful for filling narrow gaps where larger ingredients won’t fit.
- Finish the board with Halloween-themed sweets.
- Add Halloween Oreos, candy corn, fall-shaped chocolates, gummies, or other candies throughout the board.
- At this point, you really just want to fill in any noticeable empty spaces.
- For one final touch, you can tuck a few small sprigs of fresh rosemary around the board.
- The deep green color looks especially pretty against the orange, red, and cream colors of a fall charcuterie board.
